OpenGL 玩转OpenGL
需求背景
本文描述,如何利用OpenGL shader 实现一些有趣的事情,其中包括:
- 对一张纹理累加循环处理
- 实现一个细胞自动机的例子
纹理绘制、纹理循环处理
在上文 OpenGL 图像处理中已经描述如何使用OpenGL 来绘制一张纹理图,这里和上次一样使用 GLKViewController 的 GLKView 来显示纹理图,核心绘制方法有2个其中一个是正常的绘图到屏幕:
// 输入 inTex, 并绘制
void GLPlayground::drawTexture(const TextureInfo &inTex, bool isVFlip) {
    GLPlayground &d = *this;
    glDisable(GL_BLEND);
    QuadRender *quadRender = d.sharedQuadRender();
    Program *copyPass = d.sharedCopyPass();
    copyPass->use();
    copyPass->setUniformTexture("uTexture0", 0, inTex.textureID);
    quadRender->draw(copyPass, isVFlip);
}
不同的是由于需要反复使用OpenGL,需要复用 program、shader程序,以及纹理的顶点数据。故而都使用享元模式,复用一个,上面代码中, sharedQuadRender 为纹理的二维定点和纹理坐标,
QuadRender *GLPlayground::sharedQuadRender() {
    if (_sharedQuardRender == nullptr) {
        _sharedQuardRender = new QuadRender();
    }
    return _sharedQuardRender;
}
sharedCopyPass 为指定shader 的program
// 每个 vsh fsh 对应一个program
Program *GLPlayground::sharedCopyPass() {
    return getSharedProgram(65536, passthrough_vsh, passthrough_fsh);
}

// 多个program 保存在_sharedPrograms 这个map 里
Program *GLPlayground::getSharedProgram(int key, const char *vsh, const char *fsh) {
    auto iter = _sharedPrograms.find(key);
    if (iter != _sharedPrograms.end()) {
        return iter->second;
    }
    Program *program = new Program();
    if (program->init(vsh, fsh)) {
        _sharedPrograms[key] = program;
        return program;
    } else {
        assert(false);
        delete program;
        return nullptr;
    }
}
最终的绘制方法 quadRender->draw(pass, isVFlip) 则是
void QuadRender::draw(Program *program, bool bVFlip /*= false*/) {
    glBindBuffer(GL_ARRAY_BUFFER, bVFlip ? _vertexBufferVFlip : _vertexBuffer);
    program->setVertexAttribPointer("aPosition", 2, GL_FLOAT, GL_FALSE, sizeof(QuadRender::Vertex), 0);
    program->setVertexAttribPointer(
        "aTextureCoord", 2, GL_FLOAT, GL_FALSE, sizeof(QuadRender::Vertex), BUFFER_OFFSET(sizeof(float) * 2));
    glBindBuffer(GL_ELEMENT_ARRAY_BUFFER, _indexBuffer);
    glDrawElements(GL_TRIANGLE_STRIP, 4, GL_UNSIGNED_SHORT, 0);
    program->disableVertexAttrib("aPosition");
    program->disableVertexAttrib("aTextureCoord");

    glBindBuffer(GL_ARRAY_BUFFER, 0);
    glBindBuffer(GL_ELEMENT_ARRAY_BUFFER, 0);
}
以上则完成将一张纹理绘制在屏幕上,接下来要实现另一个功能,即使用指定的shader 处理纹理之后,保存输出在另一个纹理b上,其实只要在use program,指定输出到纹理即可:
 // 输出到纹理 outTex
void GLPlayground::drawToTexture(const TextureInfo &outTex, bool isVFlip, const std::function<Program *()> &fun) {
    GLPlayground &d = *this;
    glDisable(GL_BLEND);
    QuadRender *quadRender = d.sharedQuadRender();

    d.bindFBO(outTex);

    Program *pass = fun();
    glViewport(0, 0, outTex.width, outTex.height);
    quadRender->draw(pass, isVFlip);
}

// 绑定纹理
void GLPlayground::bindFBO(const TextureInfo &texture) {
    glBindTexture(texture.target, texture.textureID);
    FrameBuffer *frameBuffer = sharedFrameBuffer();
    frameBuffer->attachTexture(texture.target, texture.textureID, GL_COLOR_ATTACHMENT0);
    frameBuffer->bind();
}
void FrameBuffer::attachTexture(GLenum texTarget,
                                    GLuint texId,
                                    GLenum attachment /*= GL_COLOR_ATTACHMENT0*/,
                                    int mipLevel /*= 0*/,
                                    int zSlice /*= 0*/) {
    glBindFramebuffer(GL_FRAMEBUFFER, _fboId);
    // 把这个纹理与FBO绑定在一起,以便把数据渲染到纹理空间中去
    glFramebufferTexture2D(GL_FRAMEBUFFER, attachment, texTarget, texId, mipLevel);
}
到此为止则实现将帧缓存的数据,渲染写入到纹理outTex 中。 我们可以通过如下调用实现将纹理inText,通过指定shader 处理后输出到 outTex:
drawToTexture(outTex, [&] {
    // 指定vsh fsh
    static const char *vsh =
    #include "../glutils/passthrough_vsh.glsl"
    static const char *fsh =
    #include "../fluid/update_fsh.glsl"
    Program *pass = getSharedProgram(1, vsh, fsh);
    pass->use();
    // 指定输入的纹理和输入参数
    pass->setUniformTexture("uTexture0", 0, inText.textureID);
    pass->setUniform1i("deltaT", delta);
    return pass;
});
如果把 inText 替换成 outTex,则实现了对纹理 outTex 的循环处理,最终通过如下方式在屏幕上实现最后效果:
// 第一步:初始化inputTexture
[_inputTexture createWithImage: image];

// 通过 CGContext 从图片生成纹理
- (void)createWithImage:(UIImage *)image {
    _width = (int)CGImageGetWidth(image.CGImage);
    _height = (int)CGImageGetHeight(image.CGImage);
    CGColorSpaceRef colorSpace = CGColorSpaceCreateDeviceRGB();
    void *imageData = malloc(_height * _width * 4);

    CGContextRef context = CGBitmapContextCreate(imageData,
                                                 _width,
                                                 _height,
                                                 8,
                                                 4 * _width,
                                                 colorSpace,
                                                 kCGImageAlphaPremultipliedLast | kCGBitmapByteOrder32Big);
    CGColorSpaceRelease(colorSpace);
    CGContextClearRect(context, CGRectMake(0, 0, _width, _height));
    CGContextDrawImage(context, CGRectMake(0, 0, _width, _height), image.CGImage);

    glBindTexture(_target, _textureID);
    glTexImage2D(_target, 0, GL_RGBA, _width, _height, 0, GL_RGBA, GL_UNSIGNED_BYTE, imageData);

    CGContextRelease(context);

    free(imageData);
}
// 第二步,将_inputTexture 拷贝给 _inputTexture
preProcessing(_inputTexture, _outputTexture);
void Simulation::preProcessing(const TextureInfo &inTex, const TextureInfo &outTex) {

    drawToTexture(outTex, [&] {
        static const char *vsh =
        #include "../glutils/passthrough_vsh.glsl"
        static const char *fsh =
        #include "../fluid/prep_fsh.glsl"
        Program *pass = getSharedProgram(0, vsh, fsh);
        pass->use();
        pass->setUniformTexture("uTexture0", 0, inTex.textureID);
        pass->setUniform1i("deltaT", delta);
        return pass;
    });
}
// 第三步,对 _outputTexture 循环处理

for (,,) {
    _simulation->stepFrameTest(_stepTime, _outputTexture);
}

void Simulation::stepFrameTest(int dt, const TextureInfo &outTex) {

    drawToTexture(outTex, [&] {
        static const char *vsh =
        #include "../glutils/passthrough_vsh.glsl"
        static const char *fsh =
        #include "../fluid/update_fsh.glsl"
        Program *pass = getSharedProgram(1, vsh, fsh);
        pass->use();
        pass->setUniformTexture("uTexture0", 0, outTex.textureID);
        pass->setUniform1i("deltaT", delta);
        return pass;
    });

}
// 最后,每次拿出新的 _outputTexture 绘制到屏幕

- (void)glkView:(GLKView *)view drawInRect:(CGRect)rect {
    ......
    glutils::TextureInfo inTex = toFlowImageTexture(_outputTexture);
    _simulation->drawTexture(inTex, true);
}
细胞自动机
在上面的循环处理下,可以做出细胞自动机的demo: 首先,根据任意一张纹理,初始化细胞环境和第一代存活的细胞,其 fsh 如下:
float getY(vec4 color) {
    float r = color.x;
    float g = color.y;
    float b = color.z;
    float y = 0.299*r+0.587*g+0.114*b;
    return y;
}

void main()
{
    vec4 color = texture2D(uTexture0, vTexCoord);
    if (deltaT<0) {
        return;
    }
    // 世界是 deltaT*deltaT 大小
    float d = 1.0/float(deltaT);
    float x = vTexCoord.x;
    float y = vTexCoord.y;
    // 坐标网格化
    x = x - mod(x, d);
    y = y - mod(y, d);
    vec2 newPosion = vec2(x + d/2.0, y + d/2.0);
    vec4 newColor = texture2D(uTexture0, newPosion);

    vec4 dieColor = vec4(0.09, 0.09, 0.09, 1.0);
    vec4 liveColor = vec4(40.0/255.0, 128.0/255.0, 20.0/255.0, 1.0);
    // 指定初始状态的生死态
    if (sin(getY(newColor)*6.283) > 0.5){
        gl_FragColor = liveColor;
    } else {
        gl_FragColor = dieColor;
    }
}
每次迭代的 fsh 如下:
// 根据颜色亮度判断生死
int isLive(vec4 color) {
    float r = color.x;
    float g = color.y;
    float b = color.z;
    float y = 0.299*r+0.587*g+0.114*b;
    if (y>0.1) {
        return 1;
    } else {
        return 0;
    }
}

void main()
{
    vec4 color = texture2D(uTexture0, vTexCoord);
    gl_FragColor = color;

    if (deltaT == 1) {
        return;
    }

    float d = 1.0/float(deltaT);
    vec2 ct = vTexCoord;
    if (ct.x <= d || ct.y <= d || ct.x >= 1.0-d|| ct.y >= 1.0-d) {
        gl_FragColor = vec4(0.09, 0.09, 0.09, 1.0);
        return;
    }
    float x = vTexCoord.x;
    float y = vTexCoord.y;
    x = x - mod(x, d);
    y = y - mod(y, d);
    vec2 newPosion = vec2(x + d/2.0, y + d/2.0);
    vec4 newColor = texture2D(uTexture0, newPosion);

    vec2 up    = vec2(ct.x,   ct.y-d);
    vec2 left  = vec2(ct.x-d, ct.y);
    vec2 down  = vec2(ct.x,   ct.y+d);
    vec2 right = vec2(ct.x+d, ct.y);

    // 周围生存例子数
    int liveCount = // getY(texture2D(uTexture0, ct)) +
    isLive(texture2D(uTexture0, vec2(ct.x,   ct.y-d))) + // up
    isLive(texture2D(uTexture0, vec2(ct.x-d, ct.y))) +   //left
    isLive(texture2D(uTexture0, vec2(ct.x,   ct.y+d))) + // down
    isLive(texture2D(uTexture0, vec2(ct.x+d, ct.y))) +   // right
    isLive(texture2D(uTexture0, vec2(ct.x-d, ct.y-d))) +
    isLive(texture2D(uTexture0, vec2(ct.x+d, ct.y-d))) +
    isLive(texture2D(uTexture0, vec2(ct.x+d, ct.y+d))) +
    isLive(texture2D(uTexture0, vec2(ct.x-d, ct.y+d)));

    vec4 dieColor = vec4(0.09, 0.09, 0.09, 1.0);
    vec4 liveColor = vec4(40.0/255.0, 128.0/255.0, 20.0/255.0, 1.0);

    // 生命游戏迭代规则:
    // “繁殖”:任何死细胞如果活邻居正好是3个,则活过来
    // “人口过少”:任何活细胞如果活邻居少于2个,则死掉。
    // “正常”:任何活细胞如果活邻居为2个或3个,则继续活
    // “人口过多”:任何活细胞如果活邻居大于3个,则死掉。
    if (liveCount == 3) {
        gl_FragColor = liveColor;
    } else if (isLive(newColor)==1 && liveCount < 2) {
        gl_FragColor = dieColor;
    } else if (isLive(newColor)==1 && (liveCount == 3 || liveCount == 2)) {
       gl_FragColor = liveColor;
    } else if (isLive(newColor)==1 && liveCount>3) {
        gl_FragColor = dieColor;
     }
}
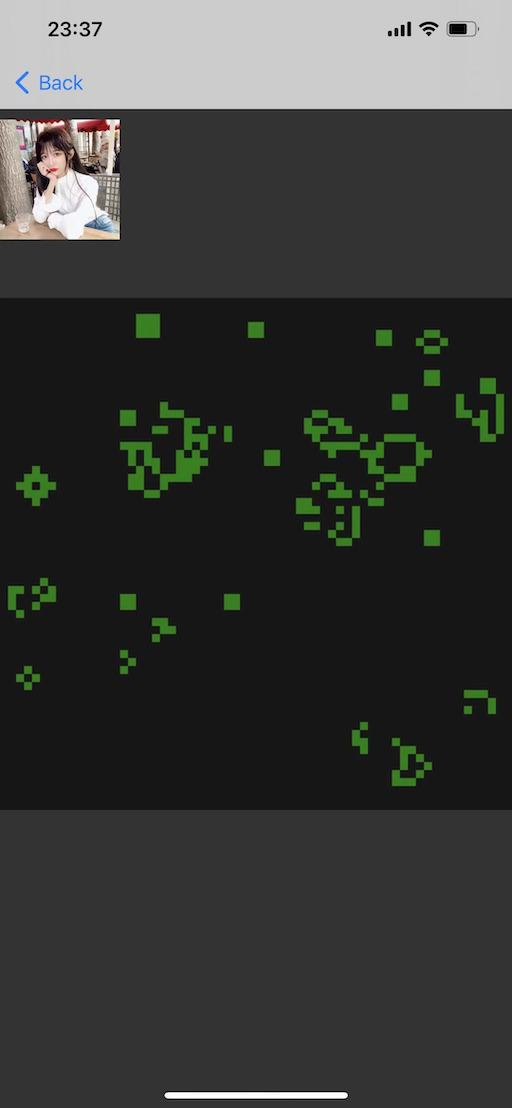
最终效果如下(任意取 1 帧):

左上角为输入的原图。
本文的代码可以在 首页->代码仓库->demo 里获取
参考文献:
关于glsl:
https://learnopengl-cn.readthedocs.io/zh/latest/01%20Getting%20started/05%20Shaders/
既已览卷至此,何不品评一二: